It’s important not to let moss take over your roof. Moss holds moisture, and if left untreated on your roof, it will eventually start to saturate and rot your shingles. Over time rotting shingles can lead to substantial water damage to your roofing system, attic, and even the inside of your home.
Removing Existing Roof Moss
Depending on the amount of existing moss on your roof, there are a few different options for removing it. If you have a significant amount of moss, it’s best to first use a push broom or utility broom to sweep away the moss clusters. Be careful to lightly sweep away the moss, as sweeping too harshly could damage or loosen the shingles on your roof. You’ll also want to make sure you’re not sweeping the moss down onto your plants or bushes below. Once the majority of the moss has been swept clean from the roof, it’s time for the next step of actually killing the moss.
For this step, you’ll need a garden pump sprayer, or a smaller outdoor spray bottle will work if the moss is only covering a small area of your roof. You’ll want to mix a bleach/water solution (typically 1/3 bleach and 2/3 water for the solution) and spray the affected areas of your roof. You’ll want to make sure the sprayer you’re using doesn’t have much pressure because high pressure can damage or loosen shingles and cause working on your roof to be dangerous. After you’ve sprayed the solution on all the place’s moss has started to grow, it should take a few days for the moss to die and then disappear from the roof following the next rainfall.
IT’S IMPORTANT not to forget about your bushes, flowers, and plants below your roof. If any bleach solution drips onto living greenery, it can cause damage or even kill a plant entirely. It’s recommended to spray down any plants and bushes with a garden hose before and after you spray the solution onto your roof, or you can completely cover any greenery during the process to prevent the bleach from ending up on your plants.
Preventing Moss from Growing on Your Roof
There are a few preventative measures a homeowner can take to prevent moss from growing on the roof again.
The first measure is to take into account the amount of direct sunlight your roof is getting each day. Moss typically grows in more shaded areas, so if trees are consistently shading your roof or part of it, you may want to explore trimming the branches from those trees or removing them entirely. This isn’t a popular option for most homeowners, so luckily there are other ways to prevent moss from growing.
The second measure is adding zinc to your roof. Zinc prevents moss and lichens from growing after it rains or when moisture gets onto your roof. The best way to add this is through a zinc coated metal strip (copper or lead strips will work too) that can be purchased at most local hardware stores. You’ll also need a hammer, roofing nails, sealant, and a margin trowel to complete this installation. The amount of zinc strips needed depends on the size or varying levels of your roof. Below are some simple instructions of how to install these preventative zinc strips onto your roof. It’s important to place your zinc strips toward the top of the roof because when it rains, the zinc will run top to bottom, covering and protecting your entire roof.
Remember to never work on a roof when it’s wet and always practice proper safety measures if you choose to work on your roof.
Installing Zinc Strips
 1. Once the shingles have been loosened, slide the zinc strip underneath the loosened shingles. If multiple strips are needed to go all the way across the row, make sure to leave a small space (around 1/8in) in-between the ends of each strip for expanding. The zinc strips will be tucked slightly underneath the loosened shingles, but most of the strips should be visible.
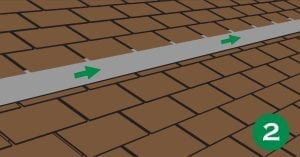 2. Start by loosening a row of shingles with the margin trowel toward the highest point of your roof. You’ll want to “unstick” the top shingle from the one beneath it, and that’s as loose as you’ll need to get the shingles.
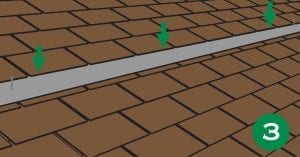 3. Once you’ve placed your zinc strip slightly tucked under the shingle, you’ll then want to secure it with roofing nails at each end. Some strips may come with nail holes, and some you may have to create the nail holes beforehand. After you’ve nailed the strip(s) down, you’ll want to add a dab of sealant over each nail head and a dotted line of sealant under each shingle and secure the shingles back into place.
Contact Tri-County
Tri-County does offer a third option for preventing algae and moss from growing on your roof: algae-resistant shingles! Contact us today for a free estimate on your complete roofing job, and make sure to ask about algae-resistant shingle options.